Azure Logic App is a fantastic product for building serverless applications and building microservices. It’s also cost-effective comparing running applications on a dedicated hosting plan or server. It has a lot of inbuilt actions and third-party connectors to integrate with various services. Unfortunately, it does not have any action for lookup when I am writing this article, unlike Data Factory. Azure Data Factory. This is another wonderful product from Microsoft Azure for integration and ETL process. It can do a lot of complex data copying, mapping, and processing without having to write a lot of code.
Anyway, I am going to show you how you can use lookup in Logic App in this article since there is no in-built action available for this. For the sake of this example, imagine the following scenario.
Contoso operates multiple online stores and mobile apps and serves in different countries. The company takes online orders from various platforms. The order information is also used by various other applications like CRM, Power BI, and third-party vendors. So it uses Azure Service Bus Topic to store the orders information in JSON format.
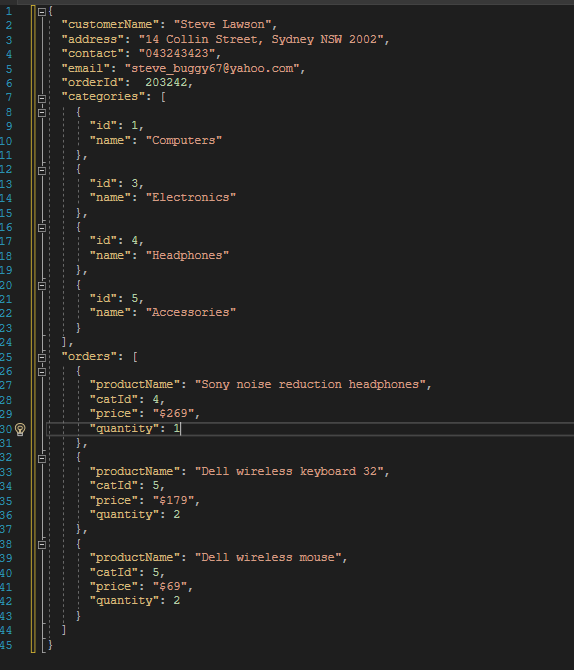
The task is to read the messages from the Service Bus Topic using a subscription and produce a CSV file so that Power BI can use this for reporting. Here is a sample of the message.
{
  "customerName": "Steve Lawson",
  "address": "14 Collin Street, Sydney NSW 2002",
  "contact": "043243423",
  "email": "steve_buggy67@yahoo.com",
  "orderId":  203242,
  "categories": [
    {
      "id": 1,
      "name": "Computers"
    },
    {
      "id": 3,
      "name": "Electronics"
    },
    {
      "id": 4,
      "name": "Headphones"
    },
    {
      "id": 5,
      "name": "Accessories"
    }
  ],
  "orders": [
    {
      "productName": "Sony noise reduction headphones",
      "catId": 4,
      "price": "$269",
      "quantity": 1
    },
    {
      "productName": "Dell wireless keyboard 32",
      "catId": 5,
      "price": "$179",
      "quantity": 2
    },
    {
      "productName": "Dell wireless mouse",
      "catId": 5,
      "price": "$69",
      "quantity": 2
    }
  ]
}
The sample message has customer information along with the orders and categories. A customer can have multiple items in an order. We basically need to flatten the file into a CSV file but need to include the category name instead of the id like below.

I will try to explain step by step guide as much as possible. Let’s get started.
Step One: Create Service Bus Topic and Subscription
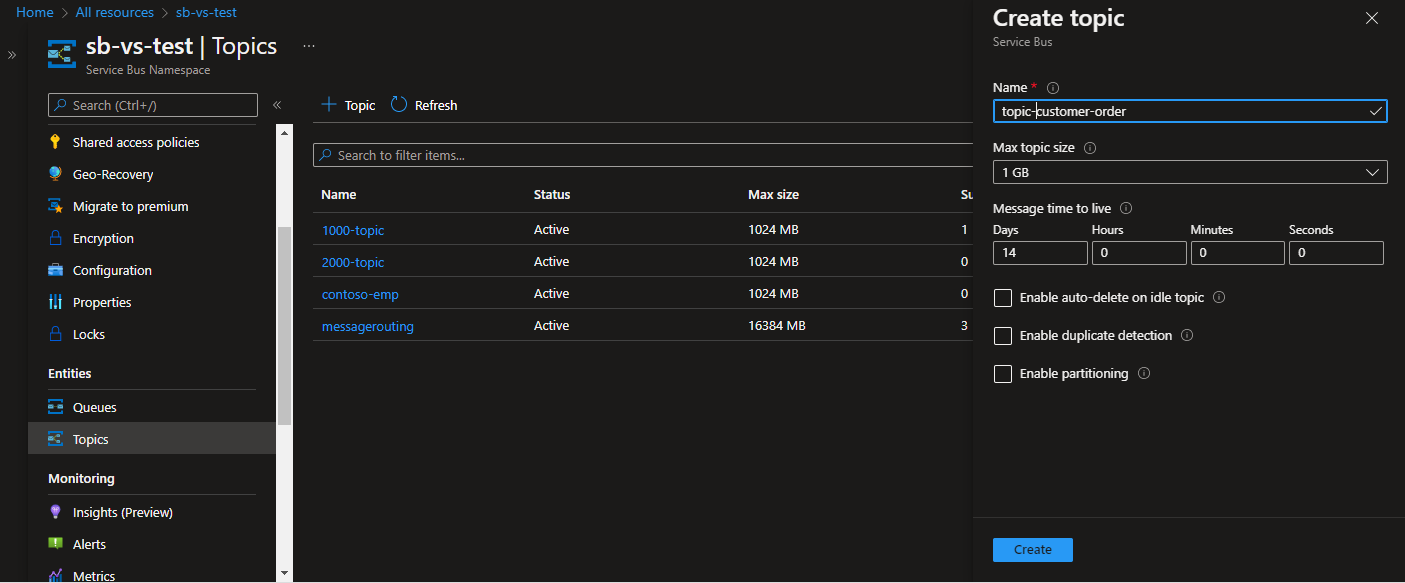
Create a service Namespace and Topic to store the order messages. In this example, I have created a topic called topic-customer-order to store order messages.
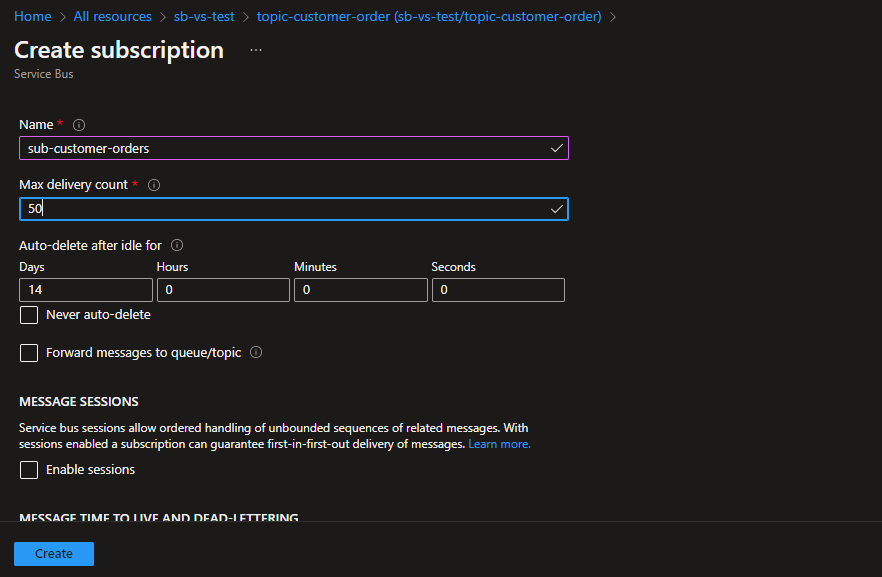
I also need to create a subscription to subscribe to the messages on the Topic. A Topic is just a central hub and it distributes the messages to the subscribers. So, there can be one or more subscribers for the same topic and messages but messages can be filtered at the subscription level using message properties.
The messages on the Topic will be posted from various sources e.g. mobile apps, online stores, etc. I can manually post a message to the topic for the sake of this tutorial. To send a message to the Service Bus Topic, browse to Topic topic-customer-order on the Azure Portal then click on the Service Bus Explorer in the left menu. This is a preview feature when I am writing this tutorial. You can basically open the message either in peek-lock or complete mode. Select the subscription then click on the Send Messages button, see the picture below. This will open another modal where you can post one or more messages at the same time.
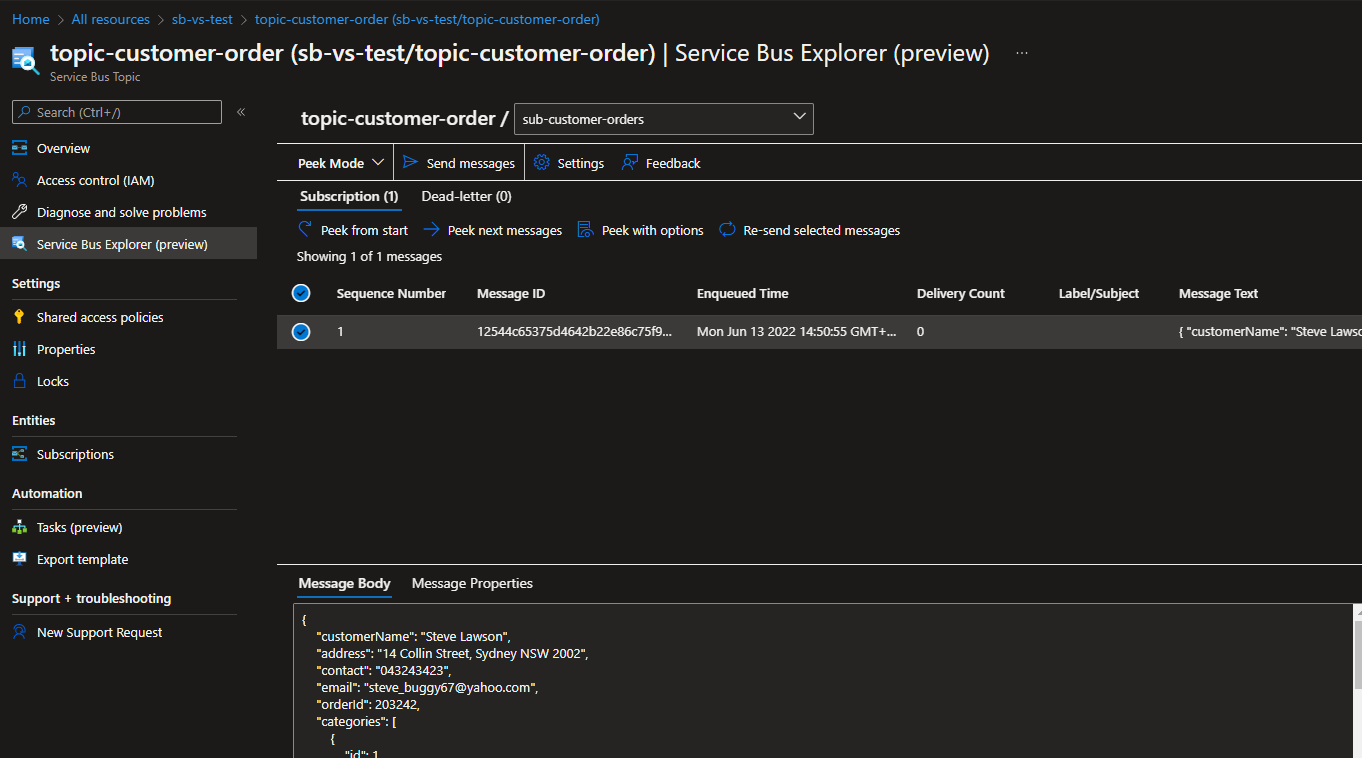
So, we have created Service Bus Namespace, Topic, and Subscription. Now let’s create the logic app to use the messages.
Step Two: Create a logic app
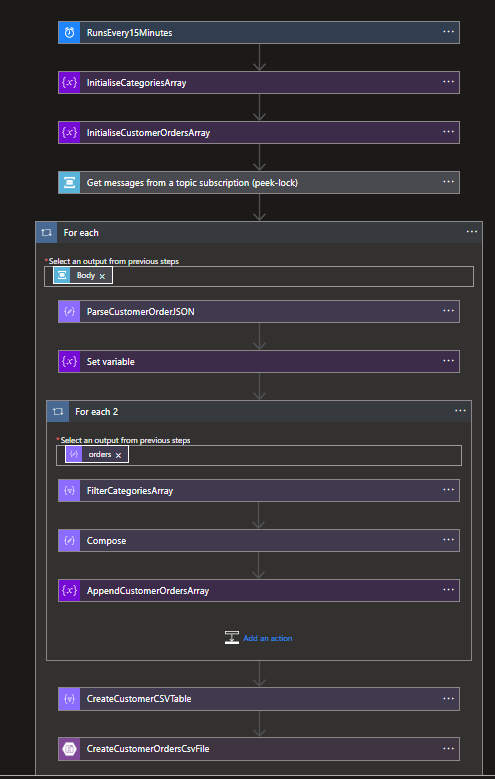
Assuming you are familiar with the Azure Portal and know how to create a resource on the Azure Portal. For the sake of this example, I am creating a consumption-based logic so that I will only have to pay based on the run. I am using a schedule (time-based) trigger to run the application every 15 minutes. You can also use event base trigger so that it will execute as soon as Service Bus Topic receives a message for the specified subscription.
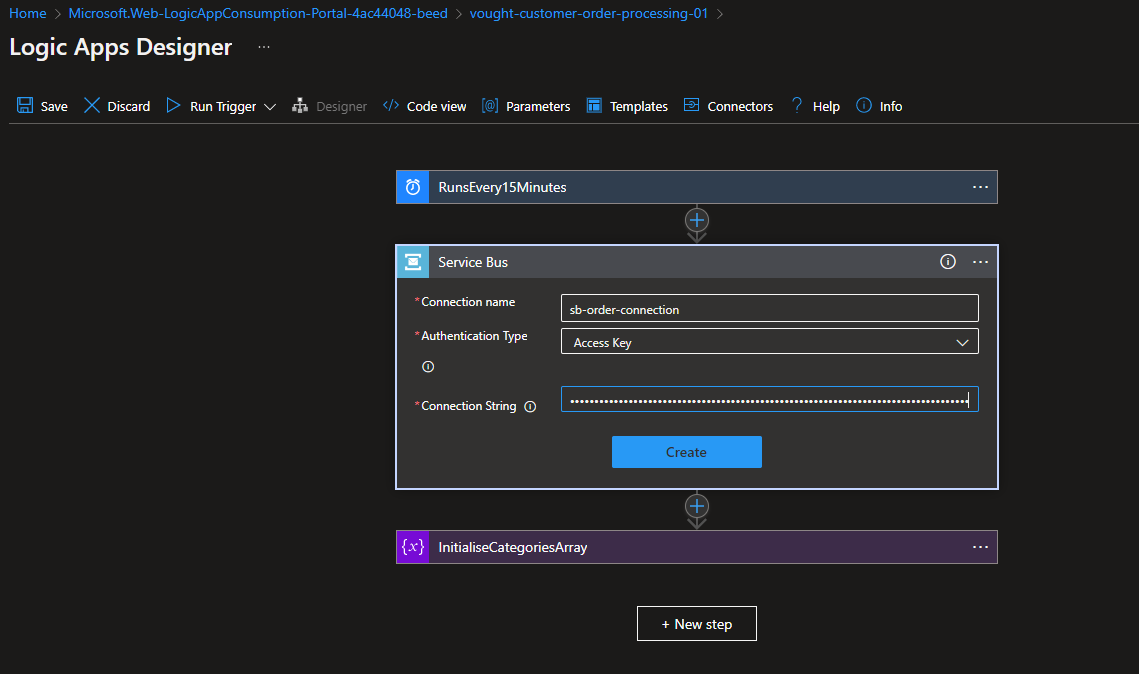
I have created a blank logic app named vought-customer-order-processing-01 and added a Schedule trigger. Just for now, I have set the schedule to run the application every 15 minutes. Basically, it will fire the application flow to check if there are any messages in the Topic subscription.
I have then added Service Bus Action Get messages from a topic subscription (peek-lock). This will require creating an API connection for the service bus using the connection string. The connection string can be found under the Service Bus namespace Shared Access Policies section. You can create a SAS token and grant different permissions if you want. In this case I am just using the RootManagedSharedAccessKey.
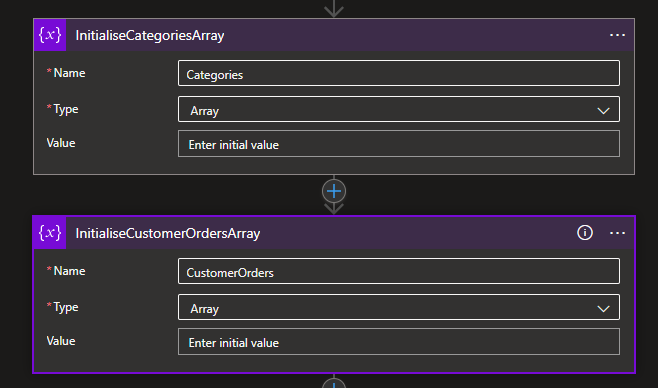
Next is initialise two array variables. One for holding the categories and the other for holding the orders. Make sure they are Type Array selected.
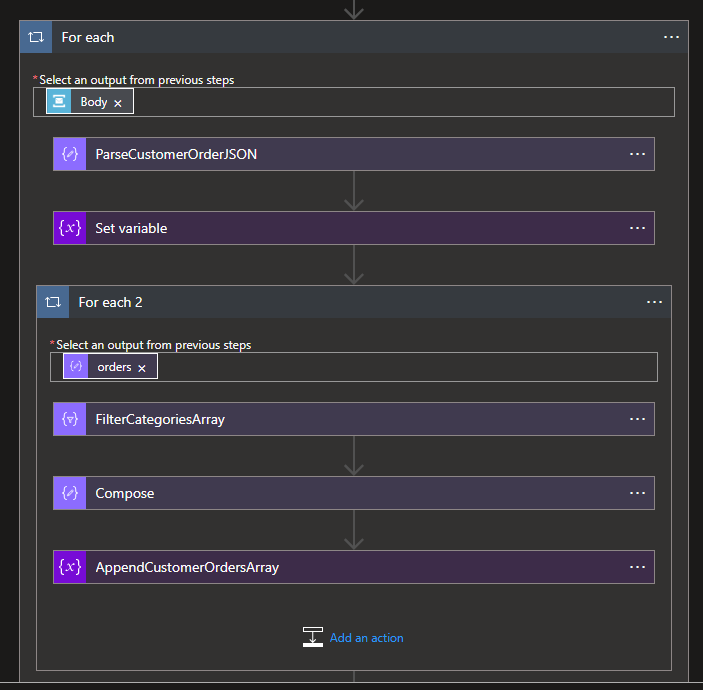
Now, create a for each loop to loop through the messages from the Topic subscription. We are mainly interested in the message body. The messages come as base64 encoded text, so we need to convert them to string otherwise you will get an error.
@base64ToString(items('For_each')?['ContentData'])
You can run the app to test the Message content after converting the data from base64 to string. It should return like below.
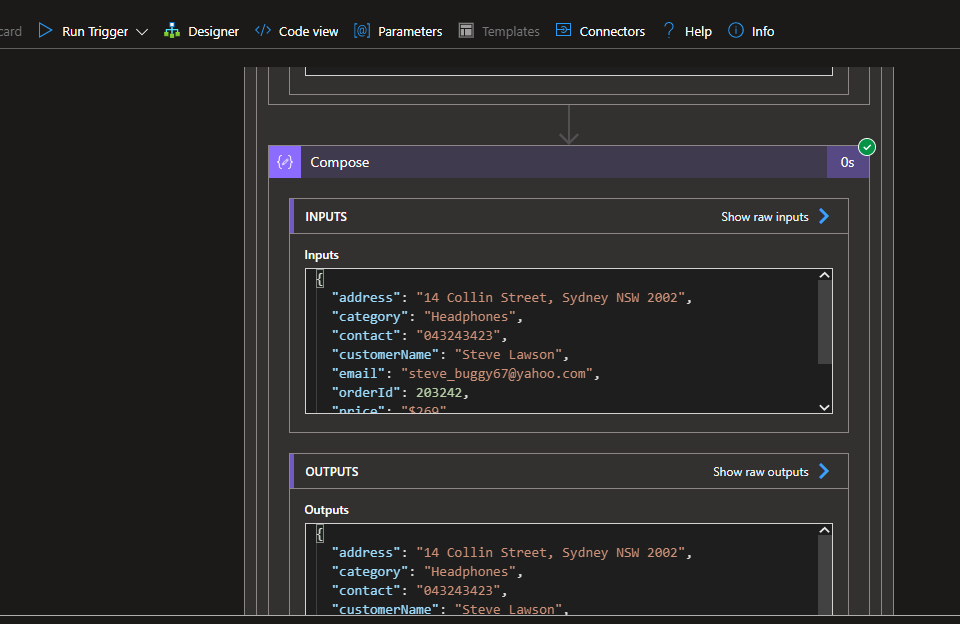
Now, I need to parse the message into a valid JSON object. This will basically give me easy access to the JSON properties. Alternatively, you have to access them manually which can be tricky sometimes.
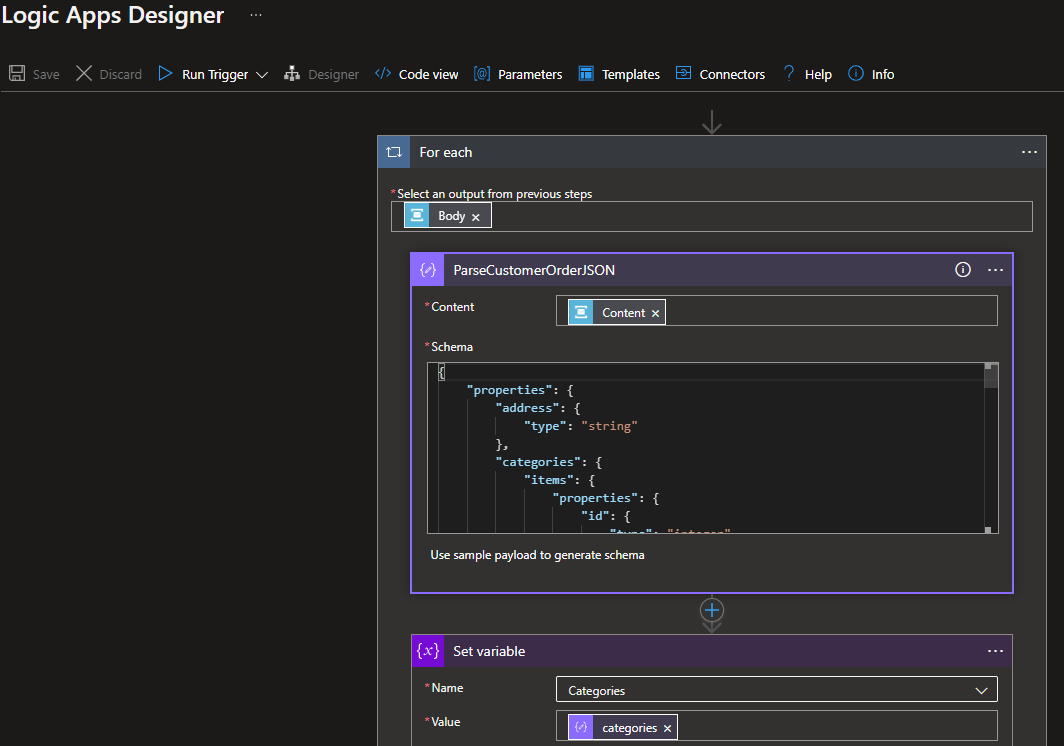
You can use the sample Payload using the sample data to generate the schema.
Now, add another action to set the variable. The idea is to set the categories array from the previous step. This will make the categories available for use.
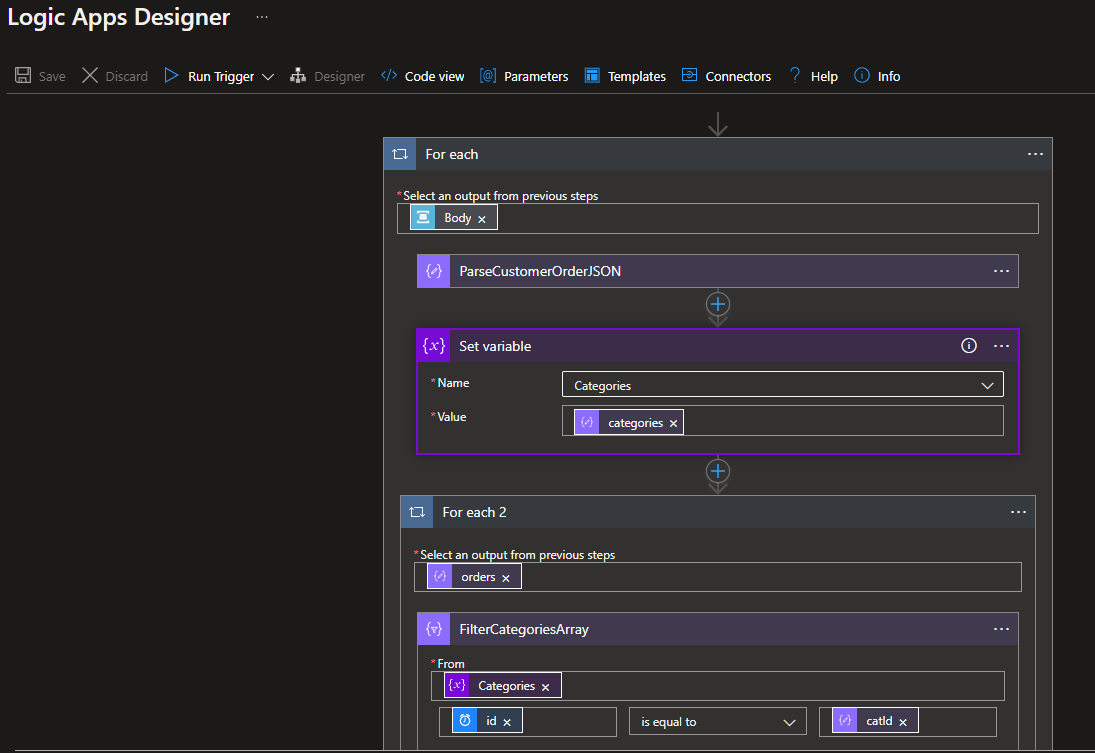
Remember a message can have multiple orders for the same customer. So we have to add another for each loop to iterate through the orders and process the data. The input for the loop is the orders from the message, see the screenshot below.
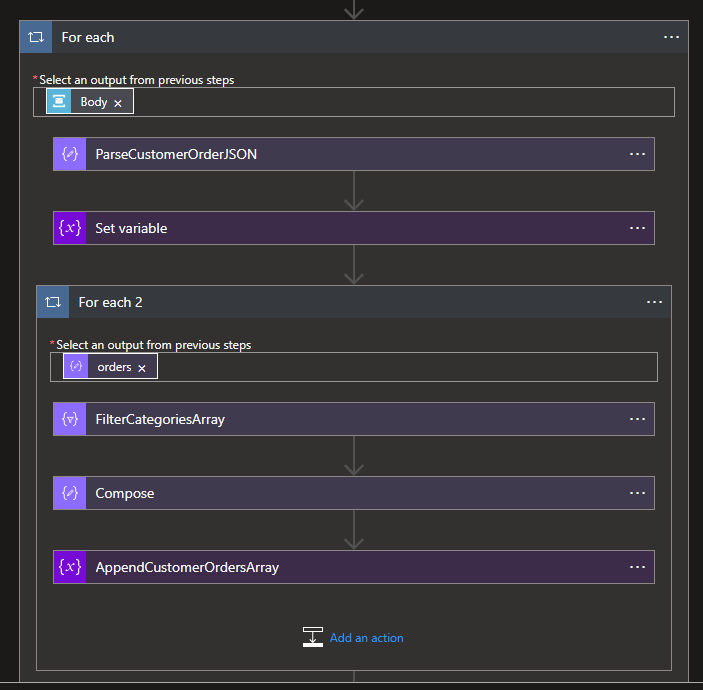
We now need to filter the categories from the categories array for each order using the category id. Categories array has two properties, see below.
"categories": [
    {
      "id": 1,
      "name": "Computers"
    },
    {
      "id": 3,
      "name": "Electronics"
    },
    {
      "id": 4,
      "name": "Headphones"
    },
    {
      "id": 5,
      "name": "Accessories"
    }
  ],
I need to filter the array using the id key this can be accessed like below and compare the value with catId from the order.
item()?['id']
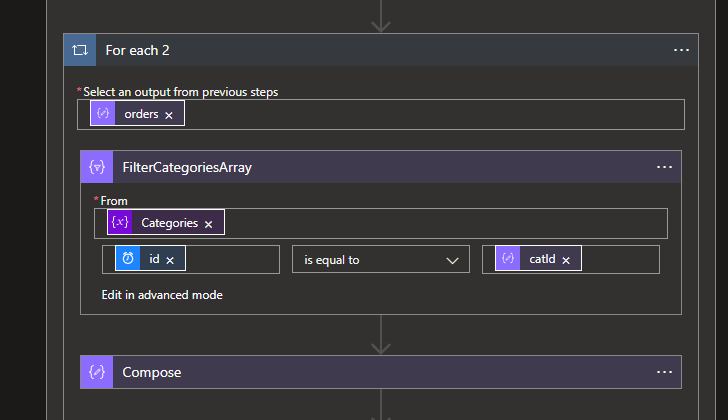
Now, we need to compose the message to the required format for generating the csv file. I have added another Data Operation action called Compose. This allows composing messages as I like including JSON and plain text etc. See the picture below, I am now adding the category name retrieved from the previous filtered array.
Important: The logic app will fail if you want to access the property where the array is empty. So I have to check for the array length first before accessing the property value like below.
if(greater(length(body('FilterCategoriesArray')),0),body('FilterCategoriesArray')[0]?['name'],null)
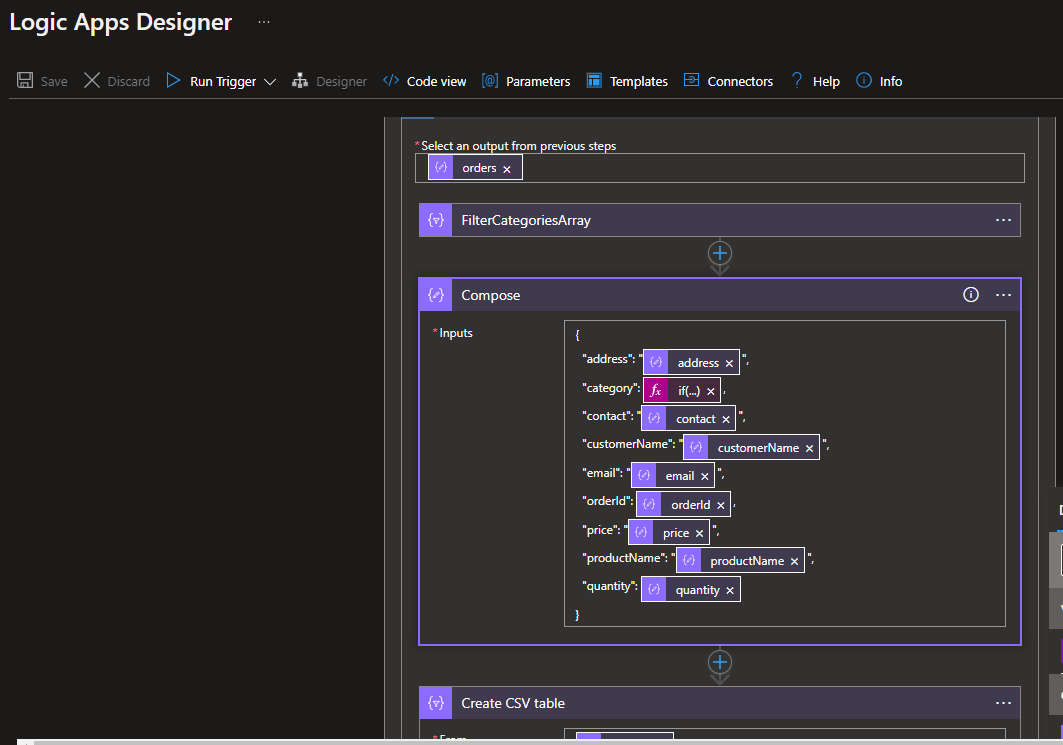
Now, add another action to append the orders array. We can now use the composed message to append the orders array.
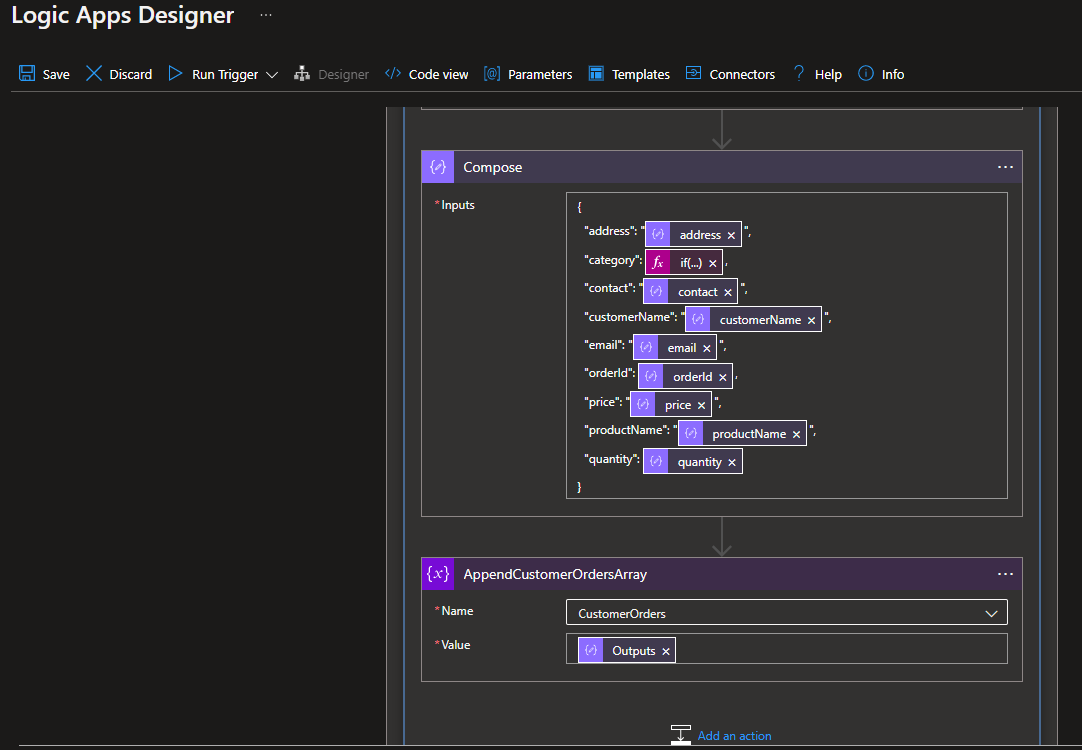
Now, the customer orders array is ready and holds all the orders in JSON format.
Step Three: Create a CSV Table
Outside the both for each loop let’s create another action to create csv table. Now you can use automatic column setting but it will basically sort the columns alphabetically which is probably not the case always. In this case, I am using a custom column and accessing the properties using from the CustomerOrders array like below.
item()?['customerName']
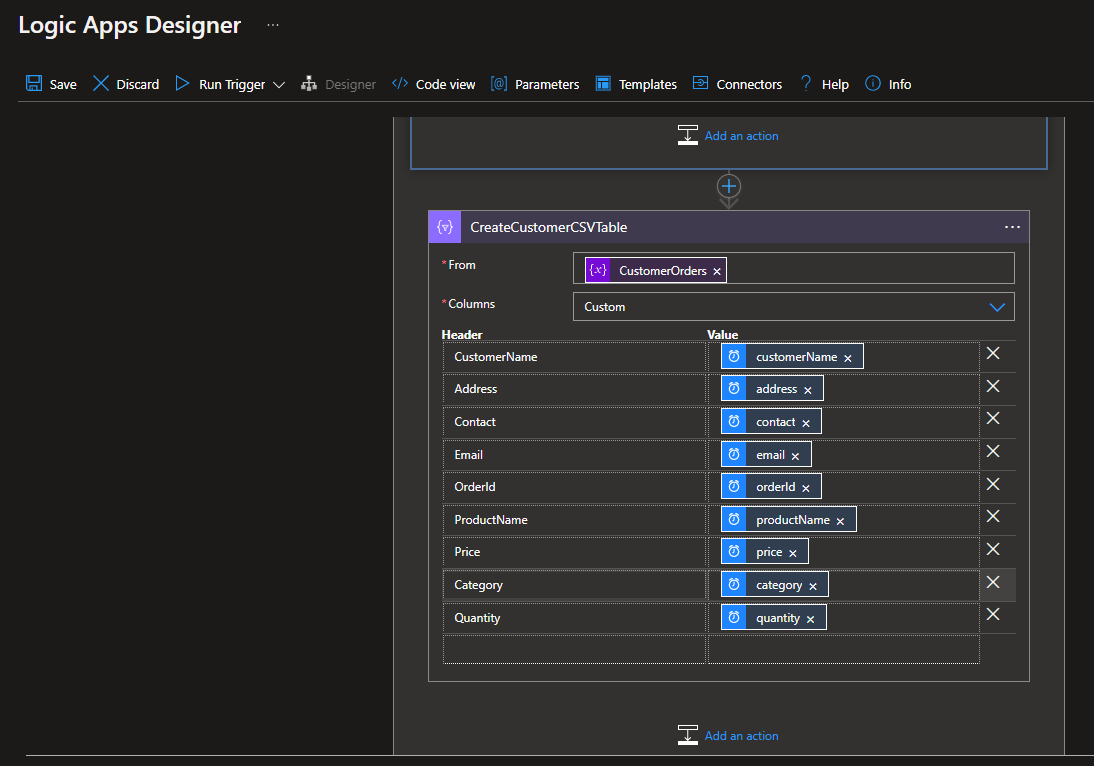
Final Step: Create a CSV file
Finally, we can create a CSV file using the CSV table from the previous step. Assuming you are familiar with Azure Storage Account. Create a container to store the CSV file. You need the Access Token and storage account name to create the API connection for the logic app. Add a new action “Create Blob” and this will open a wizard for creating the API connection. For the csv filename I am using the orderId and added the file extension .csv. The blob content is the output from the previous action.
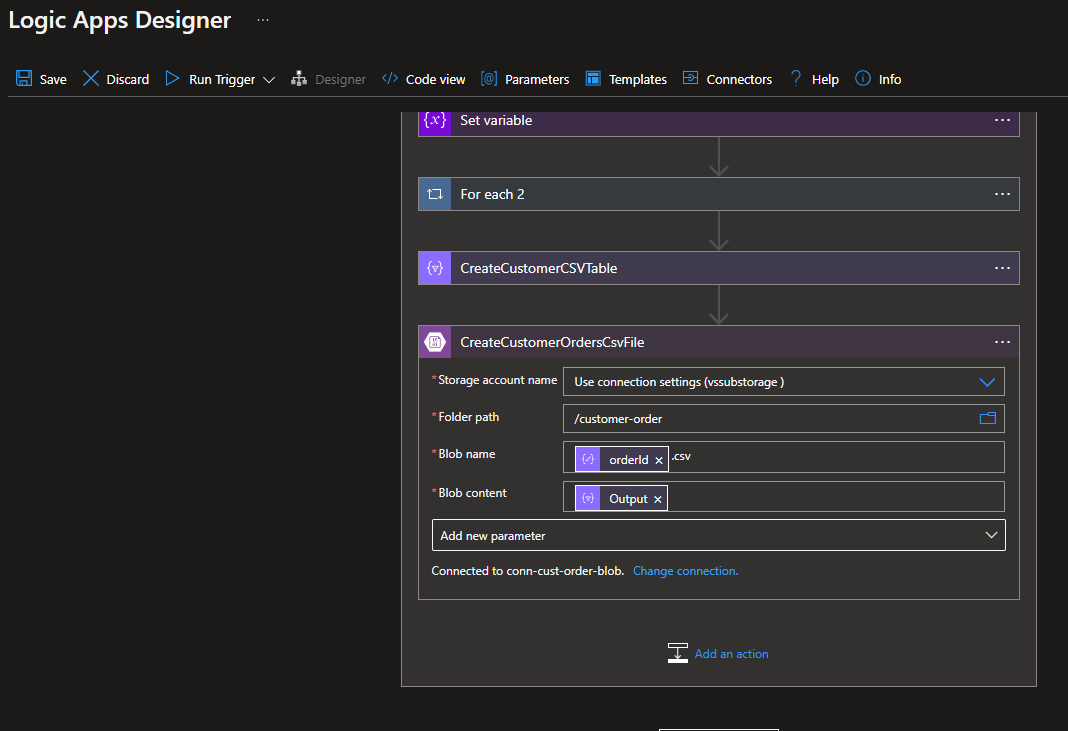
Run the application, hopefully, you will have a successful run with all green ticks.
Now you can browse to the Storage Account container and you should be able to locate the newly created file.
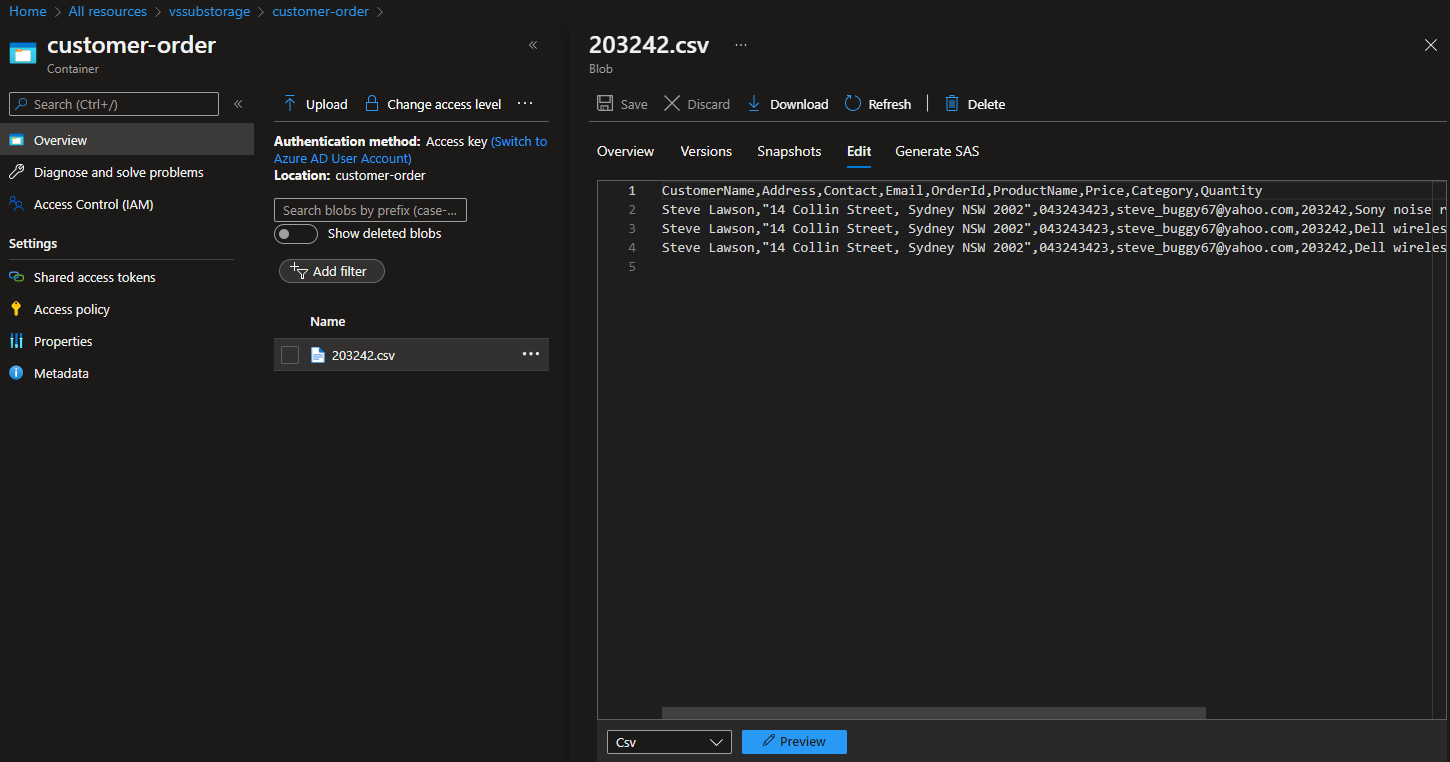
Once you finish processing the messages, you can complete the message. I have not included the Complete message step here but it’s very straightforward.
Logic App Code
{
"definition": {
"$schema": "https://schema.management.azure.com/providers/Microsoft.Logic/schemas/2016-06-01/workflowdefinition.json#",
"actions": {
"For_each": {
"actions": {
"CreateCustomerCSVTable": {
"inputs": {
"columns": [
{
"header": "CustomerName",
"value": "@item()?['customerName']"
},
{
"header": "Address",
"value": "@item()?['address']"
},
{
"header": "Contact",
"value": "@item()?['contact']"
},
{
"header": "Email",
"value": "@item()?['email']"
},
{
"header": "OrderId",
"value": "@item()?['orderId']"
},
{
"header": "ProductName",
"value": "@item()?['productName']"
},
{
"header": "Price",
"value": "@item()?['price']"
},
{
"header": "Category",
"value": "@item()?['category']"
},
{
"header": "Quantity",
"value": "@item()?['quantity']"
}
],
"format": "CSV",
"from": "@variables('CustomerOrders')"
},
"runAfter": {
"For_each_2": [
"Succeeded"
]
},
"type": "Table"
},
"CreateCustomerOrdersCsvFile": {
"inputs": {
"body": "@body('CreateCustomerCSVTable')",
"headers": {
"ReadFileMetadataFromServer": true
},
"host": {
"connection": {
"name": "@parameters('$connections')['azureblob']['connectionId']"
}
},
"method": "post",
"path": "/v2/datasets/@{encodeURIComponent(encodeURIComponent('AccountNameFromSettings'))}/files",
"queries": {
"folderPath": "/customer-order",
"name": "@{body('ParseCustomerOrderJSON')?['orderId']}.csv",
"queryParametersSingleEncoded": true
}
},
"runAfter": {
"CreateCustomerCSVTable": [
"Succeeded"
]
},
"runtimeConfiguration": {
"contentTransfer": {
"transferMode": "Chunked"
}
},
"type": "ApiConnection"
},
"For_each_2": {
"actions": {
"AppendCustomerOrdersArray": {
"inputs": {
"name": "CustomerOrders",
"value": "@outputs('Compose')"
},
"runAfter": {
"Compose": [
"Succeeded"
]
},
"type": "AppendToArrayVariable"
},
"Compose": {
"inputs": {
"address": "@{body('ParseCustomerOrderJSON')?['address']}",
"category": "@if(greater(length(body('FilterCategoriesArray')),0),body('FilterCategoriesArray')[0]?['name'],null)",
"contact": "@{body('ParseCustomerOrderJSON')?['contact']}",
"customerName": "@{body('ParseCustomerOrderJSON')?['customerName']}",
"email": "@{body('ParseCustomerOrderJSON')?['email']}",
"orderId": "@body('ParseCustomerOrderJSON')?['orderId']",
"price": "@{items('For_each_2')?['price']}",
"productName": "@{items('For_each_2')?['productName']}",
"quantity": "@items('For_each_2')?['quantity']"
},
"runAfter": {
"FilterCategoriesArray": [
"Succeeded"
]
},
"type": "Compose"
},
"FilterCategoriesArray": {
"inputs": {
"from": "@variables('Categories')",
"where": "@equals(item()?['id'], items('For_each_2')?['catId'])"
},
"runAfter": {},
"type": "Query"
}
},
"foreach": "@body('ParseCustomerOrderJSON')?['orders']",
"runAfter": {
"Set_variable": [
"Succeeded"
]
},
"type": "Foreach"
},
"ParseCustomerOrderJSON": {
"inputs": {
"content": "@base64ToString(items('For_each')?['ContentData'])",
"schema": {
"properties": {
"address": {
"type": "string"
},
"categories": {
"items": {
"properties": {
"id": {
"type": "integer"
},
"name": {
"type": "string"
}
},
"required": [
"id",
"name"
],
"type": "object"
},
"type": "array"
},
"contact": {
"type": "string"
},
"customerName": {
"type": "string"
},
"email": {
"type": "string"
},
"orderId": {
"type": "integer"
},
"orders": {
"items": {
"properties": {
"catId": {
"type": "integer"
},
"price": {
"type": "string"
},
"productName": {
"type": "string"
},
"quantity": {
"type": "integer"
}
},
"required": [
"productName",
"catId",
"price",
"quantity"
],
"type": "object"
},
"type": "array"
}
},
"type": "object"
}
},
"runAfter": {},
"type": "ParseJson"
},
"Set_variable": {
"inputs": {
"name": "Categories",
"value": "@body('ParseCustomerOrderJSON')?['categories']"
},
"runAfter": {
"ParseCustomerOrderJSON": [
"Succeeded"
]
},
"type": "SetVariable"
}
},
"foreach": "@body('Get_messages_from_a_topic_subscription_(peek-lock)')",
"runAfter": {
"Get_messages_from_a_topic_subscription_(peek-lock)": [
"Succeeded"
]
},
"type": "Foreach"
},
"Get_messages_from_a_topic_subscription_(peek-lock)": {
"inputs": {
"host": {
"connection": {
"name": "@parameters('$connections')['servicebus']['connectionId']"
}
},
"method": "get",
"path": "/@{encodeURIComponent(encodeURIComponent('topic-customer-order'))}/subscriptions/@{encodeURIComponent('sub-customer-orders')}/messages/batch/peek",
"queries": {
"maxMessageCount": 20,
"sessionId": "",
"subscriptionType": "Main"
}
},
"runAfter": {
"InitialiseCustomerOrdersArray": [
"Succeeded"
]
},
"type": "ApiConnection"
},
"InitialiseCategoriesArray": {
"inputs": {
"variables": [
{
"name": "Categories",
"type": "array"
}
]
},
"runAfter": {},
"type": "InitializeVariable"
},
"InitialiseCustomerOrdersArray": {
"inputs": {
"variables": [
{
"name": "CustomerOrders",
"type": "array"
}
]
},
"runAfter": {
"InitialiseCategoriesArray": [
"Succeeded"
]
},
"type": "InitializeVariable"
}
},
"contentVersion": "1.0.0.0",
"outputs": {},
"parameters": {
"$connections": {
"defaultValue": {},
"type": "Object"
}
},
"triggers": {
"RunsEvery15Minutes": {
"recurrence": {
"frequency": "Minute",
"interval": 15
},
"type": "Recurrence"
}
}
},
"parameters": {
"$connections": {
"value": {
"azureblob": {
"connectionId": "/subscriptions/de6c29cf-292f-4b34-8310-5add6a55e448/resourceGroups/MyResourceGroup/providers/Microsoft.Web/connections/azureblob-5",
"connectionName": "azureblob-5",
"id": "/subscriptions/de6c29cf-292f-4b34-8310-5add6a55e448/providers/Microsoft.Web/locations/centralus/managedApis/azureblob"
},
"servicebus": {
"connectionId": "/subscriptions/de6c29cf-292f-4b34-8310-5add6a55e448/resourceGroups/MyResourceGroup/providers/Microsoft.Web/connections/servicebus-2",
"connectionName": "servicebus-2",
"id": "/subscriptions/de6c29cf-292f-4b34-8310-5add6a55e448/providers/Microsoft.Web/locations/centralus/managedApis/servicebus"
}
}
}
}
}
Feel free to ask if you have any issues.
Happy cloud programming!

