Before starting this tutorial, assuming that you have installed SQL Server 2005 or SQL server 2008 installed in your local machine. If you have not installed either one of those you can download a trial version from http://www.microsoft.com/sql website. However you can install the ASP.NET membership schema in SQL Express database as well.
Varify SQL Server Database installation
Once you have installed the SQL Server 2005 or 2008, restart your computer and open SQL Sever Management Studio (this is a UI tool which allows user to interact with the database easily). In the database explorer section, expand databases and you will see if there is any existing database. Right click on databases and click on new database, follow the prompt to create a new database.
Once you created a blank database, you need to install ASP.NET membership schema to allow users to login to your website and register a new account and so on. It is very straight forward to install when you have microsoft .NET framework installed in your computer. To install ASP.NET membership schema browse the following location –
C:\WINDOWS\Microsoft.NET\Framework
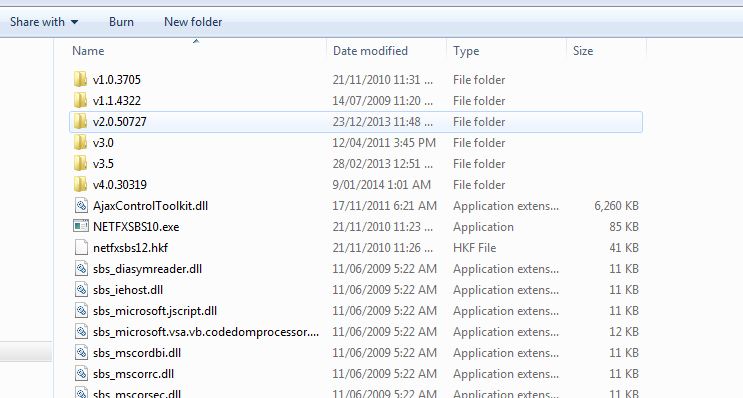
It shows all the framework version installed in your computer. Following image shows what it looks like. Double click on v2.0.50727 folder –
- ASP.NET Frameworks
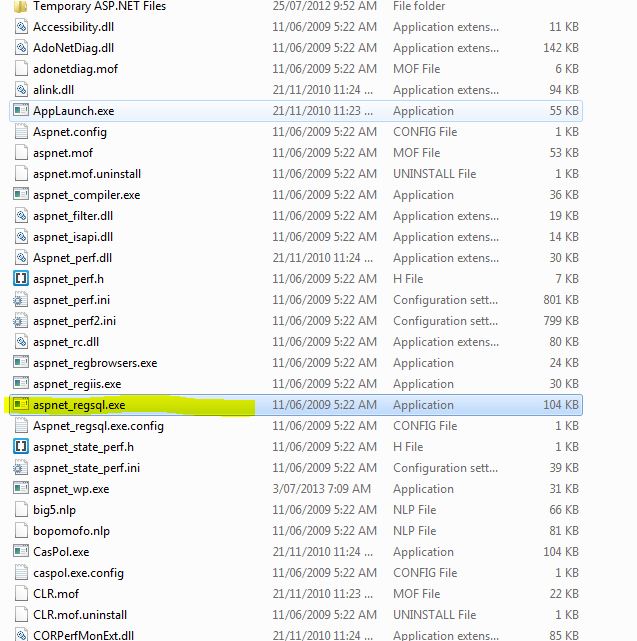
Find the executable file called – aspnet_regsql.exe and double click on it.
- ASP.NET Membership registration file
It will open up the wizard and follow the on screen prompt to install asp.net membership schema in your desired database. Make sure your server address is correct and database is selected from the dropdown list. Once you installed the ASP.NET membership Schema, you can check it in the database explorer using SQL Server Management Studio tool. You will see all the membership tables and procedures are created, those tables has prefix with aspnet_ –

Configure ASP.NET Website
Once you have installed ASP.NET membership schema, you are ready to go implementing the membership option in your website. You can just drag and drop any membership controls from login control in the toolbox. Before you start this you have to modify the connection string in web.config file so that it will direct the request to appropriate database. See the following image –
You can use windows integrated security for database connection string –
<connectionstrings>
  <remove name="LocalSqlServer">
  <add providername="System.Data.SqlClient" connectionstring="Data Source=KENS243-115\sqlexpress;Initial Catalog=whitepagesb;Integrated Security=True" name="LocalSqlServer" />
</connectionstrings>
You can also use custom membership provider in web.config file –
<!-- Membership Provider -->
<membership userisonlinetimewindow="15" defaultprovider="UmbracoMembershipProvider">
<providers>
   <add defaultmembertypealias="TestType" requiresquestionandanswer="false" enablepasswordreset="false" enablepasswordretrieval="false" type="umbraco.providers.members.UmbracoMembershipProvider" name="UmbracoMembershipProvider">
   <add connectionstringname="LocalSqlServer" type="System.Web.Security.SqlMembershipProvider" name="AspNetSqlMemberShipProvider" />
   <add requiresquestionandanswer="false" enablepasswordreset="false" enablepasswordretrieval="false" type="umbraco.providers.UsersMembershipProvider" name="UsersMembershipProvider" />
</membership>
Hope this will give you basic understanding how to install asp.net member schema in SQL Server 2005 or 2008.
There is an automated process comes with Visual Web Developer 2010. It will automatically creates the membership schema on you drag a membership control in the website and run the website. By default it uses the database file directory APP_DATA folder to store the database.


[…] In ASP.NET you can use default membership provider and use the aspnet_Profile table to store additional information of a user at the time of registration. If you don’t know how to install Membership Schema then read my previous article Installing Membership Schema in ASP.NET. […]