
Building a web app in Blazor is awesome. Blazor lets you build interactive web UIs using C# instead of JavaScript. Blazor apps are composed of reusable web UI components implemented using C#, HTML, and CSS. Both client and server code is written in C#, allowing you to share code and libraries.
It uses SignalR for the backend communication that gives a real-time experience. The framework is lightweight and can also be published as a web assembly that supports offline user experience. The great thing I like about Blazor is I can add my C# code in between HTML codes which gives great flexibility in building modern web applications. It looks nicer and cleaner comparing the Dotnet core framework even though it still uses dotnet core for the backend services.
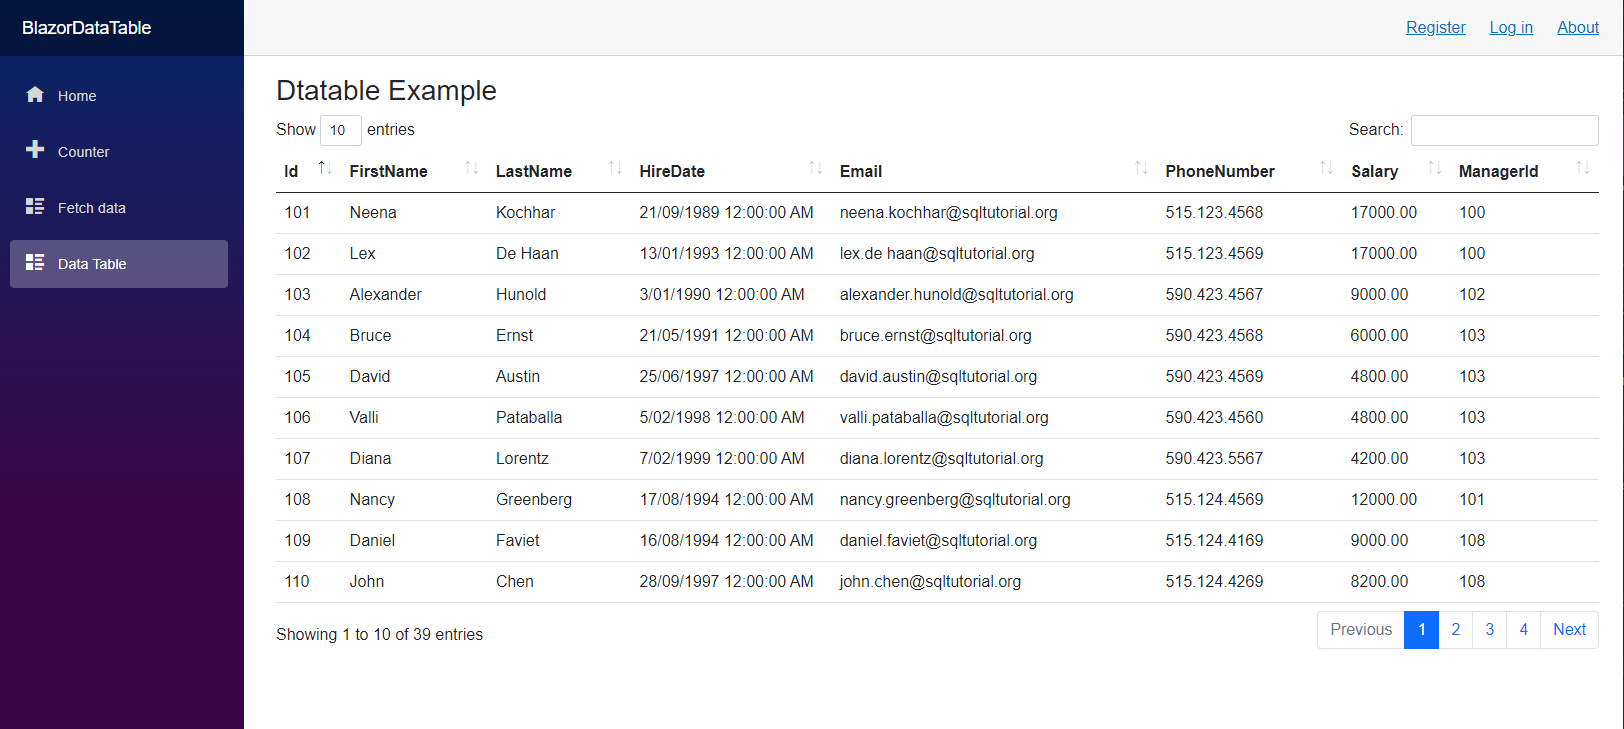
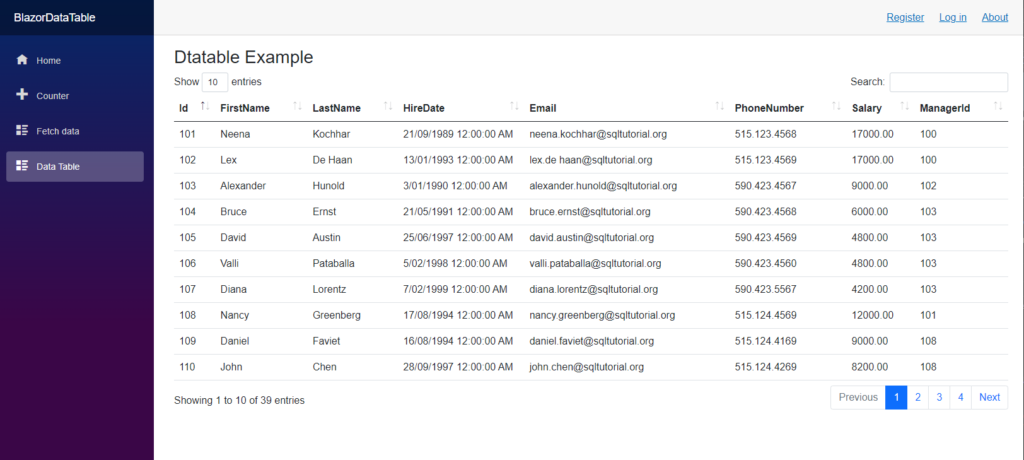
In this example, I am demonstrating how to integrate jQuery DataTable in a Blazor application. DataTable is another lightweight JS library and is super easy to integrate with any frontend UIs. You can read the documentation on the DataTable website. This basically turns a normal HTML table with a large number of rows into a nice paged table view with searching capability, sorting and paging. The downside of this, it uses client-side rendering as a result it loads the data on page load and renders the table view. It is probably not suitable for large datasets. In this case, you may consider handling the pagination on the server-side using AJAX request. This is also possible using DataTable, however, it requires further configuration.
One of the issues I noticed integrating DataTable with a Blazor application is a bit tricky since the Blazor app uses the SignalR, it leaves the data table wrapper behind when you navigate to different pages. For this, the JS object has to be disposed of correctly after being rendered.
Step One:
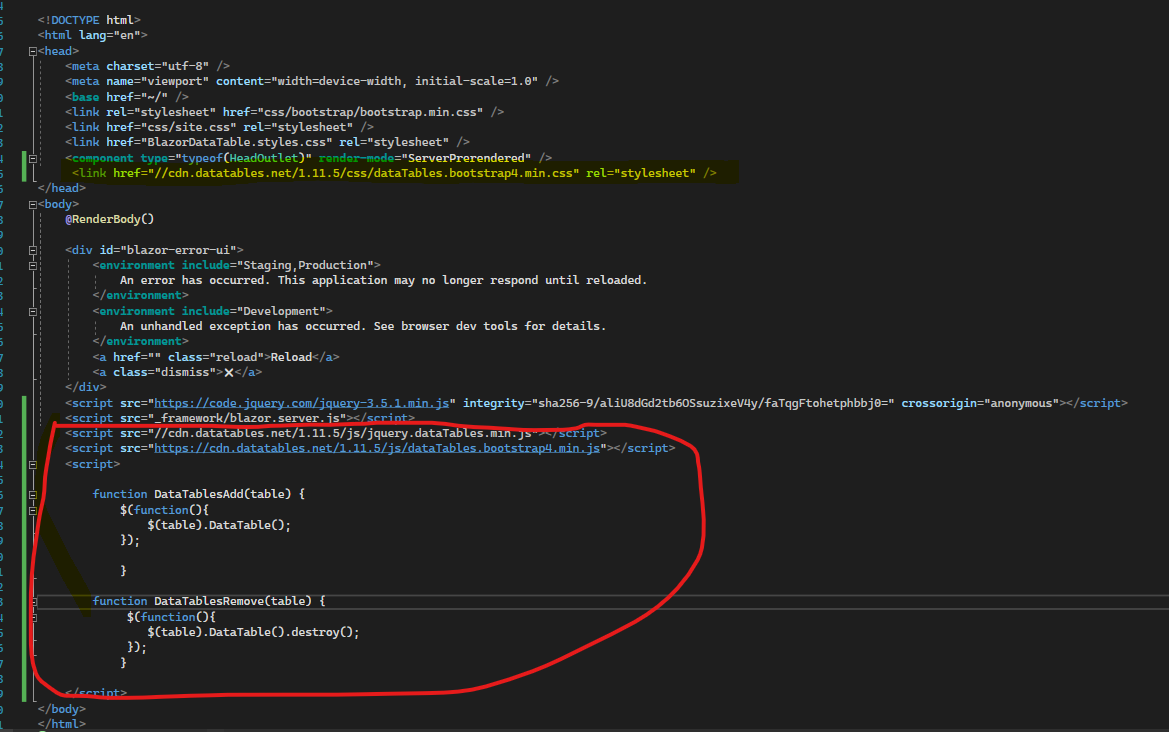
Include the js files and CSS files for the jQuery DataTable in the _Layout.cshtml or _Host.razor (if you’re using asp dotnet 5) pages.
<head>
    <meta charset="utf-8" />
    <meta name="viewport" content="width=device-width, initial-scale=1.0" />
    <base href="~/" />
    <link rel="stylesheet" href="css/bootstrap/bootstrap.min.css" />
    <link href="css/site.css" rel="stylesheet" />
    <link href="BlazorDataTable.styles.css" rel="stylesheet" />
    <component type="typeof(HeadOutlet)" render-mode="ServerPrerendered" />
     <link href="//cdn.datatables.net/1.11.5/css/dataTables.bootstrap4.min.css" rel="stylesheet" />
</head>
Include the following javascript codes just before the body closing tag.
<script src="https://code.jquery.com/jquery-3.5.1.min.js" integrity="sha256-9/aliU8dGd2tb6OSsuzixeV4y/faTqgFtohetphbbj0=" crossorigin="anonymous"></script>
    <script src="_framework/blazor.server.js"></script>
    <script src="//cdn.datatables.net/1.11.5/js/jquery.dataTables.min.js"></script>
    <script src="https://cdn.datatables.net/1.11.5/js/dataTables.bootstrap4.min.js"></script>
    <script>

        function DataTablesAdd(table) {
            $(function(){
                $(table).DataTable();
            });

            }

        function DataTablesRemove(table) {
             $(function(){
                $(table).DataTable().destroy();
             });
            }

    </script>
Make sure you include the jQuery library as well. This is required since I am using jQuery ($) selector.
 Step Two:
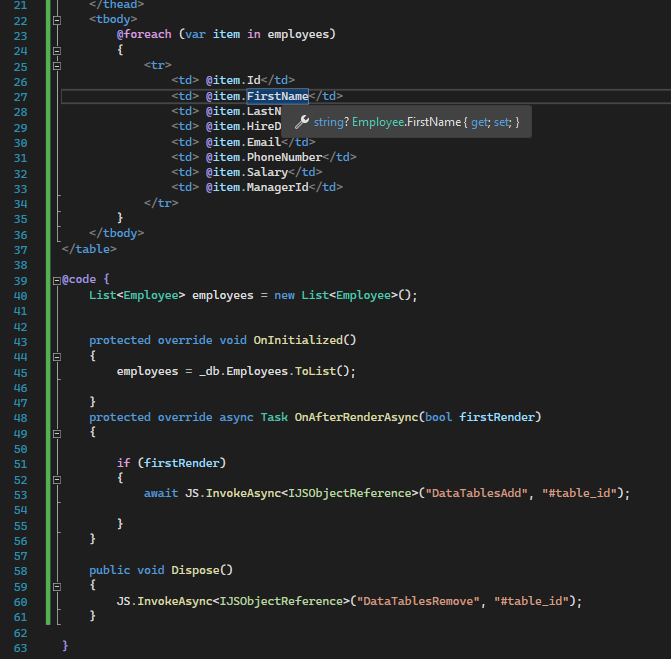
Create a new page to setup the data table. Create an HTML table and set the table CSS properties if you like. Use the id for the table, this will be used for selecting the DOM element.
<table id="table_id" class="table table-border table-hover">
    <thead>
        <tr>
            <th> Id</th>
            <th> FirstName</th>
            <th> LastName</th>
            <th> HireDate</th>
            <th> Email</th>
            <th> PhoneNumber</th>
            <th>Salary</th>
            <th> ManagerId</th>
        </tr>
    </thead>
    <tbody>
        @foreach (var item in employees)
        {
            <tr>
                <td> @item.Id</td>
                <td> @item.FirstName</td>
                <td> @item.LastName</td>
                <td> @item.HireDate</td>
                <td> @item.Email</td>
                <td> @item.PhoneNumber</td>
                <td> @item.Salary</td>
                <td> @item.ManagerId</td>
            </tr>
        }
    </tbody>
</table>
Step 3:
Use the following C# code inside the code block. In this example, I am getting the employee data from a SQL Server database using Entity framework.
List<Employee> employees = new List<Employee>();


    protected override void OnInitialized()
    {
        employees = _db.Employees.ToList();

    }
    protected override async Task OnAfterRenderAsync(bool firstRender)
    {

        if (firstRender)
        {
            await JS.InvokeAsync<IJSObjectReference>("DataTablesAdd", "#table_id");

        }
    }

    public void Dispose()
    {
        JS.InvokeAsync<IJSObjectReference>("DataTablesRemove", "#table_id");
    }
The above codes are very straightforward. I am basically binding the data table using JS Interop. This a new feature Blazor introduced to make asynchronous requests.
You can download the source code from Github.
Happy programming.